# Install a VirtualMetric Server
To install the VirtualMetric software, the following requirements must be met:
* A **virtual machine** with at least **4 vCPU** and minimum **8 GB RAM**.
* Windows Server **2019**, **2022**, or later.
* A **100 GB** Hard Disk Drive
* Microsoft Edge or Google Chrome (Internet Explorer is not supported)
To host a *VirtualMetric Database*, you need to meet the following requirements:
* A **virtual machine** with at least **8 vCPU** and minimum **16 GB RAM** memory.
* Operating System: Ubuntu 22.04 or later / Red Hat Enterprise Linux (RHEL) 7 or later / Debian 9 or later
* System Drive: **100 GB** Hard Disk Drive for OS and Database Software
* Data Drive: **100 GB** Hard Disk Drive minimum for basic data retention
On the Linux machine, the following CPU flags must be enabled for the *Clickhouse* database to operate properly:
* `adx`
* `avx`
* `avx2`
* `bmi1`
* `bmi2`
* `clmul`
* `fma`
* `pclmulqdq`
You can get the list of enabled CPU flags by running this command:\
`sudo cat /proc/cpuinfo | grep flags | head -n 1 | tr ' ' '\n' | sort`
{% hint style="info" %}
When running VirtualMetric on a virtual machine, do not use dynamic resource allocation, but make sure that full resources are available to the virtual machine at any time.
{% endhint %}
## Hardware Requirements
Hardware requirements for VirtualMetric mainly depend on the modules, intervals, and history ranges. The following should serve as reference points for the minimum requirements of VirtualMetric:
* Dual Core CPU
* 4096 MB Memory
* 100 GB Hard Disk Drive
{% hint style="info" %}
When running VirtualMetric on a virtual machine, do not use dynamic resource allocation, but make sure that full resources are available to the virtual machine at any time.
{% endhint %}
***
## Software Requirements
Before installing VirtualMetric on Windows Server, make sure that you have following components on Windows Server:
* Microsoft PowerShell v4 or later
* .NET Framework 2.0 or later
***
## Running The Setup Application
Installing VirtualMetric is easy since it is like any other Windows-based application. To install VirtualMetric, all you have to do is to run the setup program you have downloaded.
1\. You first need to allow the setup process to run with **User Account Control**:
Confirm the question with **Yes**. *VirtualMetric Setup Wizard* will guide you through the process.
2\. You will see the **Welcome** Screen.
Click **Next** to continue.
3\. You will see the **License Agreement**.
Accept the terms to continue and click **Next**.
4\. In this step, you will configure the settings required by VirtualMetric's API.
* You can use either an **IP address** or **FQDN** for API connectivity. All servers will use this address for inventory and performance statistics collection. If you use FQDN, the domain should be resolved by all servers.
* By default, VirtualMetric's API listens on TCP **8080**. You can change the configuration if you want to use a different one. VirtualMetric will configure its REST API with this port.
* Setup will add a firewall rule to **Windows Firewall** as part of the installation.
{% hint style="warning" %}
The VirtualMetric API address should be reachable by all servers. For details, please see the [Firewall Configuration](https://docs.virtualmetric.com/installation/broken-reference) section.
{% endhint %}
After filling the required fields, click **Next**.
5\. In this step, you will configure the **VirtualMetric Dashboard**.
* Setup will enter the VirtualMetric API address automatically. Clients will use this VirtualMetric API address when they connect to VirtualMetric Dashboard. If VirtualMetric API is in a private network, you should type the external VirtualMetric API address here. Otherwise, clients will not be able to login to the dashboard due to failure to reach the network.
* Setup will require you to type a username and a password, and confirm the password by retyping. You will use this username and password to login to the dashboard for the first time. The password must be at least 6 characters long.
{% hint style="info" %}
Do not forget to write down your username and password. Setup will *not* remind you these values after it completes.
{% endhint %}
{% hint style="warning" %}
If you want to secure the *VirtualMetric Dashboard* and VirtualMetric API connections with an SSL certificate, please visit the [Setup SSL Certificate](https://docs.virtualmetric.com/maintenance#setup-ssl-certificate) section.
{% endhint %}
After filling the required fields, click **Next**.
6\. In this step, you will configure the **VirtualMetric Clickhouse Database**.
* Enter your Server IP Adress, and the your username and password you have configured previously.
* After filling the fields, check that the database connection works by clicking the **Test Clickhouse Connection** button.
When you verify the connection, click **Next**.
7\. In this step, you will configure the destination location.
Review the location you have entered, and click **Next**.
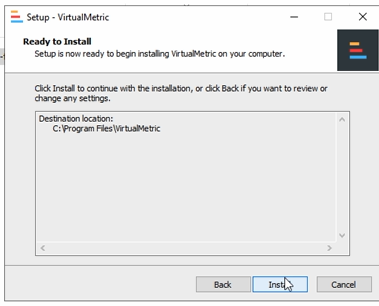
8\. Once these settings are made, a prompt dialog will appear stating that setup is ready to install.
Click **Install** to start the process.
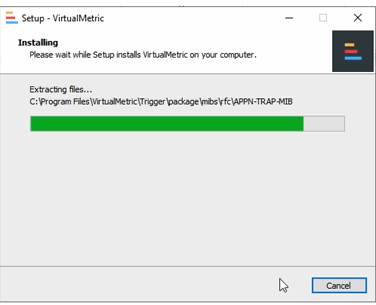
9\. A dialog showing the process will appear.
You can monitor the progress of the installation process here to see whether it completes smoothly.
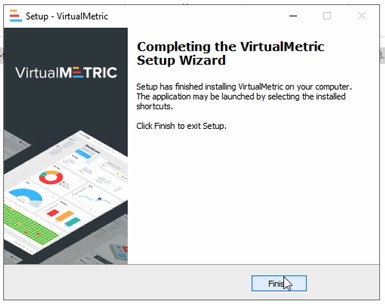
10\. When the installation process completes without any errors, you should see the closing dialog.
Click **Finish** to exit the *Setup Wizard*.
***
## First Time Login
Once the VirtualMetric is installed, you can log in to the web interface in your browser and enter the **IP address** or **DNS name** of the computer where VirtualMetric is installed.\
\
If you are logged in to the VirtualMetric server, you can use following address.
```markup
http://localhost
```
After loading the *VirtualMetric Dashboard*, you will see the login screen below.
You can log in using the **username** and **password** that you have provided on Setup Wizard. After you have typed them, click the **Login** button to log in.
When you log in for the first time, you will see a *Welcome Screen*.
VirtualMetric Welcome Screen
Click the **Go to Settings** button to navigate to the *Settings* page. Here, you can activate your product and start monitoring your data right away.